![]() User Guide
User Guide ![]()
11.1 Creating a Script File
This chapter gives instructions for creating a script file (script.dat) assuming you already have a basic understanding of scripted mode. For an overview of scripted mode, see Scripted Mode vs. Unscripted Mode.
CCS gives you flexibility in creating a script file. There are three options that vary in their degrees of difficulty and ability to precisely place thermals. The rule is – the less the difficulty, the less the ability to precisely place thermals. For throwing together an impromptu scripted session, you’ll probably choose the easiest method. For a more formal, planned event, you may choose to use a more difficult method and perform more labor-intensive thermal placement in order to enhance realism. Here’s how to create your script file:
1. If you want to save any existing script.dat in your CCS program folder, either remove it from this folder or change its name (to something other than “script.dat”). Otherwise, the existing file will be overwritten.
2. Start the CCS Control Panel program.
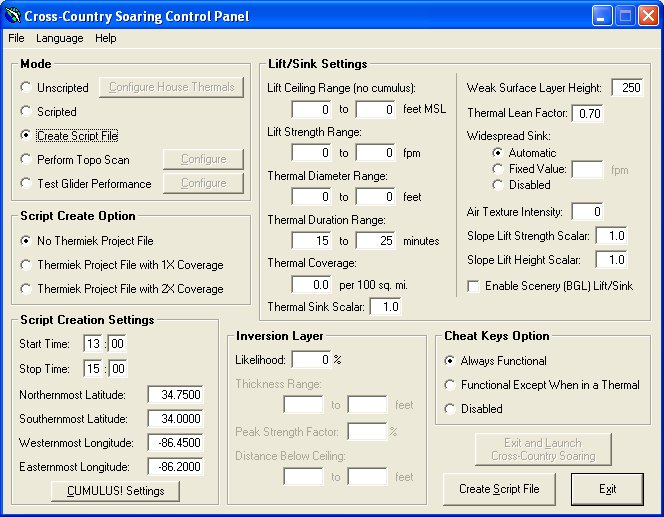
3. Select Create Script File mode.
4. In the Script Create Option section, select the desired option. See below for descriptions of the options.
5. Enter the desired settings in the Lift/Sink Settings and Inversion Layer sections.
6. In the Script Creation Settings section, set the desired Start Time and Stop Time.
7. If not using a Thermiek project file, set the desired latitudes and longitudes defining the rectangular area in which you want thermals.
8. If using a Thermiek project file, rename the project file thermiek.prj, and place it in your CCS program folder.
9. If you want to create CUMULUS! clouds with this script file, then click CUMULUS! Settings. See CUMULUS! Settings for more about this option.
10. Select the desired Cheat Keys Option.
11. Click the Create Script File button.
No Thermiek
Project File (Easiest)
CCS will use all the Control Panel settings to create script.dat, randomly placing thermals in the defined area throughout the defined time period.
Thermiek
Project File with 1X Coverage (Moderately Difficult)
This method is slightly more difficult but gives you some control over precise thermal placements. This method involves the use of a Thermiek project file (*.prj) and will most likely be used to convert an existing project file for use with CCS. CCS will use the project file for thermal locations but will use Control Panel settings for all other parameters. Because CCS thermals are of limited duration, each thermal in the project file is active only half the time. To maintain the thermal coverage in the project file, CCS randomly places an equal number of thermals to the number in the project file. Each such random CCS thermal is placed within three miles of its “partner” project file thermal. Thus, for example, if the project file was built to prevent thermals over a large body of water in the flight area, CCS will maintain the absence of thermals in this “no thermal” area (give or take up to three miles). Using this method, expect 50% of thermals (the ones created randomly by CCS) to have no Thermiek BGL clouds at their tops and to only align with any Thermiek BGL clouds by coincidence. (If you intend to use CUMULUS! to create BGL clouds using a CUMULUS! source file created by CCS along with your script file, then this issue doesn’t exist.)
Thermiek
Project File with 2X Coverage (Most Difficult)
This is the most difficult method but gives you precise control over the placement of each thermal. As does the previous method, this method involves the use of a Thermiek project file (*.prj). This method will only be used by serious designers who set out to create a CCS script file with precisely placed thermals. This method is exactly like the previous method, except that the project file should be created with double the desired thermal coverage. By doubling the coverage, CCS doesn’t need to create “partner” thermals. Each CCS thermal’s placement will match that of one project file thermal. There will be no CCS thermals at locations other than where defined in the project file, and every project file thermal will be in the CCS script file. Only half the project file thermals will be active at any given time.
If using an option involving Thermiek, you may use multiple project files. CCS will only accept a single file as an input, though, so you must manually combine these multiple files into one. To do so, just copy the “bodies” (the parts of the files containing the thermal records – not including the header or any blank lines) of all desired PRJ files (except one) into one PRJ file with an intact header. Then use this modified PRJ file as an input to CCS.
If using an option involving Thermiek, the only project file information used by CCS is thermal position information (latitudes and longitudes). All other information in the project file (e.g., thermal diameters, thermal ceilings, etc.) is ignored by CCS. CCS assigns these things based on CCS Control Panel settings. This makes it easy to use a single project file to create many different script.dat files with varying thermal diameters, durations, strengths, and ceilings.
Thermal-Cloud Alignment
General
Information
The script file defines each thermal’s position (latitude and longitude) at its top. With wind, the thermal will “lean” such that the top of the thermal is downwind of the bottom. This approach is used to create thermal realism in wind and still align CCS scripted mode thermals with any static scenery (*.bgl) clouds produced from (1) the CUMULUS! file created by CCS or (2) the Thermiek project file on which the script file was based.
CUMULUS!-Specific
Information
If using a CCS-generated CUMULUS! file to create CUMULUS! clouds, there’s nothing more to know. CCS automatically creates the clouds at the same altitude as the thermal tops.
Thermiek-Specific
Information
If using a Thermiek project file to create a CCS script file, any precision-placed thermal will align with its desired ground trigger only in calm winds. That is, in Thermiek you’re actually placing the clouds (i.e., the thermal tops), not the triggers. CCS will “anchor” the thermal to the cloud’s (if present) latitude/longitude (at CCS’ lift ceiling altitude) but will place the bottom of the thermal an appropriate distance upwind. If using Thermiek-based BGL clouds, either create an FS cumulus cloud layer at the base altitude of the BGL clouds, or set clear skies (no clouds) in FS and modify script.dat to set the “Lift Ceiling” to the base altitude of the BGL clouds. (The best plan is to design the script file to have thermal ceilings at the same altitude as the clouds in the Thermiek project.) A CCS thermal will only align perfectly with its BGL cloud when the cloud’s base is at the exact CCS “Lift Ceiling” altitude (or FS cumulus layer cloudbase altitude). Because CCS considers the lift ceiling to be a certain MSL altitude despite the terrain, time of day, or any other factors, create all Thermiek-designed BGL clouds with the same MSL base altitude in order to get the best alignment of CCS thermals with Thermiek BGL clouds.
CCS causes Thermiek-based scripted mode thermals to cycle on and off throughout the soarable period, although Thermiek BGL clouds are eternal (i.e., stay “on” all day). Thus, if BGL clouds are used based on the Thermiek project file, each cloud will only have a thermal under it half the time during the soarable period. The cloud’s thermal will cycle on and off periodically as defined by the script file creator. Outside the soarable period, each BGL cloud will, of course, have no thermal under it.
Customizing an Existing Script File (script.dat)
An existing script file can be customized somewhat to give different flying conditions. This could save you the trouble of creating another data file, if you only want to change one of the file’s “customizable” settings. The following is an excerpt from a sample script.dat with the customizable settings highlighted. See Customizing Soaring Conditions for descriptions of these settings.
Thermiek project map: (none used)
start
time:
stop
time:
[Lift/Sink
Settings]
Lift
Ceiling (no cumulus): 6000 feet MSL
Weak
Surface Layer Height: 1000 feet AGL
Thermal
Lean Factor: 0.70
Widespread
Sink: 15 fpm
Air
Texture Intensity: 0
Enable
Scenery (BGL) Lift/Sink: 0
Slope
Lift Strength Scalar: 1.0
Slope
Lift Height Scalar: 1.0
Thermal
Sink Scalar: 1.0
[Inversion
Layer Settings]
Present:
1
Thickness: 1000 feet
Peak
Strength Factor: 50 percent
Distance
Below Ceiling: 1000 feet
'Cheat
Keys' Option: 1
00000
0.830614 0.214346 0.510 3.0 0 47400 1140
00001
0.829808 0.194203 0.605 2.8 0 47400 0780
00002
0.818041 0.190279 0.716 2.5 0 47400 1020
00003
0.832442 0.207218 0.663 2.7 0 47400 1200
The following can not be customized in script.dat. If you want to change any of the following, you must create a new script file (see above).
· thermal locations
· thermal diameters
· thermal durations
· thermal strengths
· thermal times
If using BGL clouds generated to match your existing script.dat, do not alter script.dat’s “Lift Ceiling” setting, as this will cause lateral misalignment (except in calm winds) and vertical misalignment of CCS thermals and the BGL clouds.