|
Server Manual
Caffe Server is an application which
continuously monitor status of your client computers, game consoles,
tables etc. It controls time usage of your computers, maintain
customers accounts, setup security, and provide you with complete logs
and up-to-date reports.
| Main server control panel |
|
|
Different options are located on main server control panel:
• 'Caffe' - Displays computers and their current status
• 'Point Of Sale' - point Of Sale (pOS) module with complete evidence
of items
• 'Statistics' - Shows earnings and charged items for certain time period
• 'Setup' - Administrator options used to configure Internet Caffe Software
• 'Logoff' - Lock Server or change employee
• 'Timecodes' - This is pre-paid mode where you can generate and sell codes to your customers
• 'Members' - Configure accounts for regular customers with special prices
• 'Messages' button - Send/Received messaged from customers>
• 'Network traffic monitoring' - Shows how much network traffic is generated by each customer
• 'Reservations' - Waiting list scheduling
• 'Uncharged items' button - Uncharged items currently on customers bills
• 'Show orders' - Show items ordered from client computers
• 'Send statistical report by e-mail'
• 'Shut down' - All the clients from server
• 'Chain' button - Reconnect Clients to Server
• 'Change and reorder icon appearance' with ability to change icons, hide them or change position
• 'Add time' - Use it to Add more time to the timecode or member account
• '1' - Label client computer icons with the number of the computer
• 'a' - Label client computer icons with the name of the computer
• 'Clock button' - Show remaining time instead of number or name of client computer
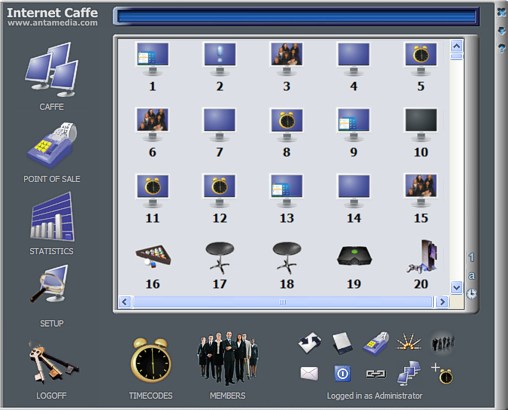
The picture shows 15 client computers : computers
1,9 and 13 are running in play & pay mode. Computers 5, 8, 11 and 12 are
running in Time Code mode and computer number 6 and 15 in member mode. On the
second computer customer has ended his session in play & pay mode, and
employee should charge the bill. Computer number 10 is not connected to the
server. Other computers are available for use.
| Controlling client computers |
|
|
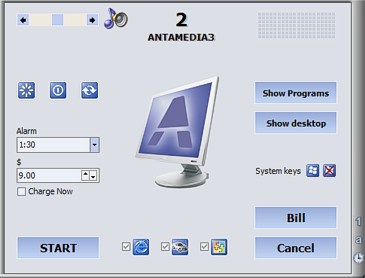
Double click on computer icon will show panel with options:
•  'Reset' button - Client computer can be rebooted and your customer will have 'fresh' computer 'Reset' button - Client computer can be rebooted and your customer will have 'fresh' computer
•  'Shutdown' button - press this button to switch off Client computer 'Shutdown' button - press this button to switch off Client computer
• Sending the message to your customer is easy: type the message and press Enter key
•  'Change computer' - Customer can change computer and this will be added on the customer’s bill 'Change computer' - Customer can change computer and this will be added on the customer’s bill
• 'Start-Stop' button is used to start or end the session
• 'Bill' button - press this button when you want to charge the bill to your customer
• 'Alarm' - If a customer specify the time period that customer’s session will last, set the requested time in this field
• '$' - Type amount of money that customer want to spend in
your cafe. This will set Alarm for closing automatically customer
session
• 'Show programs' - Option allows you to see all open programs
on the client computer and gives you the ability to close unwanted
programs from the server
• 'Show Desktop' - You can take a look anytime at Client's
desktop. Check if anything suspicious is going on or assist to customer
in some minor problems. Save this picture for later analysis if you
want.
• 'System keys' - Use it to disable/enable Windows system keys on the client computer (ctrl+esc, windows key ...)
• In left upper corner you can change sound volume on the client computer from the server
• In right upper corner an employee can see the time that the session has been running and the session cost
| How to start session in 'play and pay' mode ? |
|
|
|
1. Choose what kind of programs your customer will use by
checking the buttons. If you allow only Internet programs, games and
office programs will be inaccessible for a Client. price will be
calculated for the time spent on the Internet. By default, all three
program types are allowed. In this case the price is based on the
highest price (per hour) between these 3 modes. |
|
|
2. press • 'START' button |
Related Link: pricing |
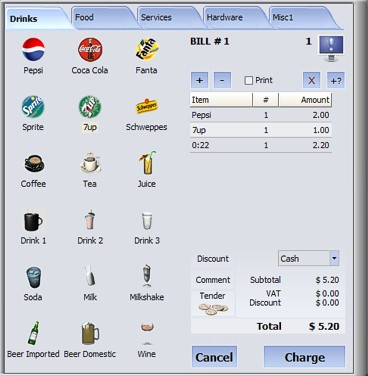
| Point Of Sale : How to sell drink and hardware or charge services? |
|
|
1. Choose what you wish to sell in the lists (in this case '7up, CD-R and Hamburger' are selected).
2. Use '+' to add more items
3. Use '-' to delete number of the items from the bill
4. Use '+?' button to choose the amount of the items you wish to sell
5. 'X' - Delete item from a list
6. Determine whether you want to print a receipt ( • 'PRINT' button)
7. Determine whether you want to give discount for this bill
8. Add a comment for this bill
9. To charge a bill press 'Charge' button
| How to charge customer bill ? |
|
|
When your customer finish the
session, you can charge the bill. Bill panel shows items sum, VAT costs
(if you have specified), discount and total price that your customer
will pay.
press 'Bill' button and Bill panel will show on the screen.

|
|
• 'Discount' - Choose discount for this bill
• 'Comment' - Add comment on this bill
• In combobox choose type of payment: cash, check, debit or credit card
• Use • 'Charge' button to charge the bill
Working with timecodes is very practical. You can sell your services in advance and your customers are obliged to come back.
You can generate timecodes for example, for 30 minutes, 1 hour, 5 hours
and sell them to your customers. This time can be used when customer
wants to. If there is some time left on their timecode, it can be used
some other time when customer comes in your cafe.
When customer use timecode, employee assistance is not needed. Customer
will start session by entering timecode, and end his session by
pressing the button 'LOGOFF' on the main Client's panel. Caffe Server is taking care of time calculations for you.

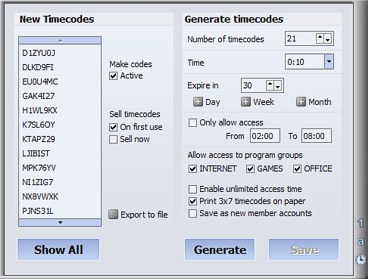
| How to generate and sell timecode ? |
|
|
1. Type how many timecodes you want to generate in the # field
2. Choose the amount of time you want to sell (on this picture it's 2:00 hours)
3. Choose what kind of programs your customer will use by checking Internet,Office and Games buttons
4. Choose if you want to sell the timecodes 'On First Use' or 'Sell
Now'
5. Press 'Generate code' button
6. Determine whether you want to print a receipt by checking 'print 3x7 timecodes On paper' option
7. Press 'Save' button and timecodes will be stored in a database
• 'Only allow access' - With this option enable login only at specified dayttime
• 'Enable Unlimited Access Time' - Enable this option if you want to give unlimited time to the customers
• 'Save As New Member Account' - Enable this option if you want to use generated timecodes as Member accounts
• 'Export to file' - Save the list of generated timecodes to *.TXT file
| How to add more time to an existing timecode ? |
|
|
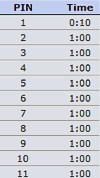
1. Choose the timecode from the list that you wish to add time to
2. Choose the amount of time you want to add in the 'Time' field
3. press 'Add Time' button
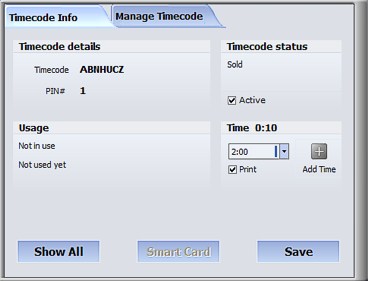
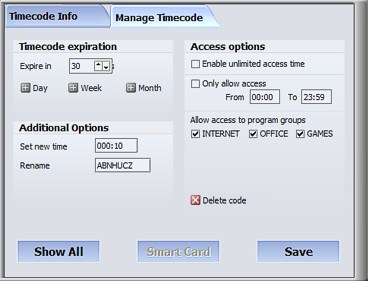
• 'Timecode Expiration' - Set new expiration date to timecode
• 'New Time' - Set new time to timecode
• 'Rename' - Change timecode name
• 'Enable Unlimited Access Time' - This option gives you the ability to give unlimited access time to customer
• 'Only Allow Access' - With this option enable login only at specified dayttime
• 'Allow Access To program Groups' - Check which services would be available to this timecode: Internet, Office, Games
• 'Delete timecode' - Press this button to delete timecode from the list
• 'Show All' - Show the list of all timecodes
• 'Smart Card' -Save timecode on smart card
• 'Save' - Any change on Manage timecode page request to press • 'Save' button
Special protection from employee abuse can be implemented using 'protect with PIN' option.
If you assume that employees are using (or reselling) already sold
timecodes this option will help you to . It actually hides Timecode
(like BJ84STN) and replaces it with PIN number (like # 6). Employees
will not be able to see the customers timecodes. In order to implement
this option, there are few options to be selected:
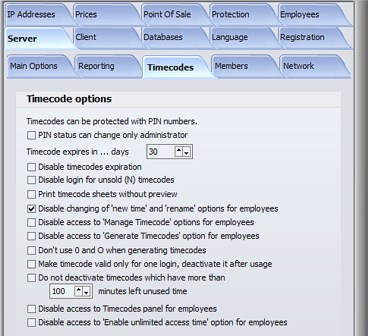
1. Check • 'protect with PIN' option to replace timecode names with pIN numbers
2. Go to Setup - prices - prepaid - Timecode options, and check "pIN status can change only administrator'.
3. Generate timecodes in advance. For example generate 84
timecodes, print them on paper (4 pages with 3x7 timecodes), cut
timecode papers, and put each timecode in letter envelope. Give your
employees to sell it. Since timecodes are printed (and kept in letter
envelope) and stored in database (but also hidden with pIN numbers on
the server), employees are not able to see Timecodes. If a customer
comes to see how much time he has or to add some more time on his
timecode, he will tell his PIN number, and not his timecode.
|
|
• 'PIN status Can Change Only Administrator' - If you check this option employees can't change pIN status
• 'Timecode Expires In ... Days' - Set default timecode and member expiration
• 'Disable Timecode Expiration' - This option gives you ability to Enable/Disable timecode expiration
• 'Disable login For Unsold (N) timecodes' - Check this option to allow login only for the sold timecodes
• 'print Timecode Sheet Without preview' - Check this option to print timecode sheet without preview
• 'Disable changing Of New Time And Rename Options For Employees' - Employees can't rename and set a new time to timecode
• 'Disable Access To Manage Timecode Option For Employees' - Employees don't have access to Manage Timecode page
• 'Disable Access to Generate Timecodes option For Employees' - Generate timecodes button is hidden for employees
• 'Don't Use 0 And O When Generating Timecodes' - Use this option if you can't recognize 0 and O on printed receipt
• 'Make Timecodes Valid Only For One Login, Deactivate it After First Usage' - timecode deactivation after first usage
• 'Do Not Deactivate Timecodes Which Have More Than xxx Minutes Left Unused Time' - deactivate timecodes only when time left is below specified minimum
• 'Disable Access To Timecodes panel For Employees' -Timecode icon (from main server screen) is hidden from employees
• 'Disable access to 'Enable unlimited access time' option from employees' - Use it to hide 'Enable unlimited access time' from employees
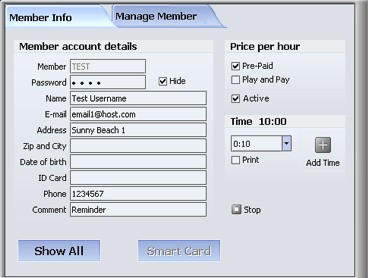
Membership database is used to create special terms of use for your regular customers. Each member have his own configurable price per hour as well as different accessing options.
You can give them for example 30% discount and disable internet
feature. What happens? When they login on client, Internet button will
be hidden and they will not be able to use any of the internet programs.
To create new member follow these steps:
1. Type member username (on the picture: TEST)
2. Type member password
3. Fill the rest data fields if you like (Name...Comment)
4. Choose pre-paid time or play and pay
5. press 'Save' button
If customer use pre-paid time choose the amount of time you want to add in the 'Time' field, and press 'Add Time' button.
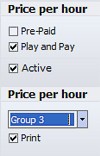
If customer choose play and pay mode set his price group and press 'Save' button
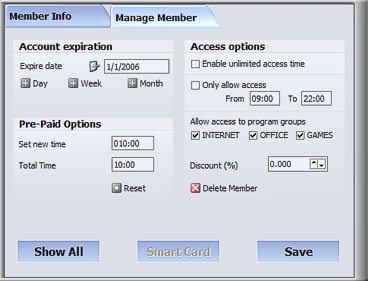
• 'Account Expiration' - Set the expiration date to member account
• 'Set New Time' - Set new time to member
• 'Discount' - You can give for example 30% discount to member (available only in pre-paid mode)
• 'Enable Unlimited Access Time' - This option gives you ability to give unlimited access time to member
• 'Only Allow Access' - If you set this option, a member can login only at specified time (Example: from 9:00h to 22:00h)
• 'Allow Access To program Groups' - Check which services would be available to this member: the Internet, Office, Games
• 'Delete Member' - press this button to delete member from a list
• 'Reset' - Use it to reset total member time
• 'Stop Member' - Stop members session on client computer.
• 'Show All' - Show list of all member accounts
• 'Smart Card' - Save member account on a smart card
• 'Save' - Any change on Manage Member page request to press 'Save' button
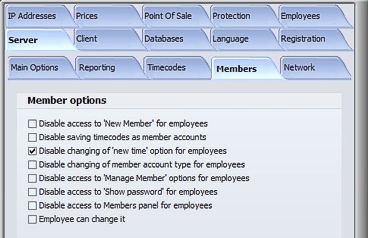
• 'Disable Access To 'New Member' For Employees' - Use this option to hide New Member button from employees
• 'Disable Saving Timecodes As Member Accounts' - If you don't
want to allow your employees to do a mass member account generation,
check this option. If unchecked, the option can be used to quickly make
a very large number of member accounts where the timecode will be used
as member username and pin number will become the member password.
• 'Disable Changing Of New Time Option for Employees' - Employees will not be able to set New Time to member (pre-paid)
• 'Disable Changing Of Member Account Type For Employees' - Check employees can't change account type from pre-paid to play And pay mode)
• 'Disable Access To Manage Member Options For Employees' - Employees will not have access to Manage Member page
• 'Disable Access To Show password for Members' - If you check this option employees will not be able to see the member passwords
• 'Disable Access To Members panel For Employees' - Member icon (from main server screen) will be hidden from employees
• 'Employee Can Change It' -If this option is unchecked the employees will not be able to change members discount
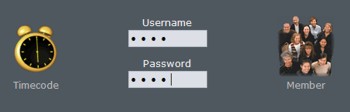
When a member wants to start the session he will:
1. In Username field type member's username
2. In password field type member's password
3. press the Enter key
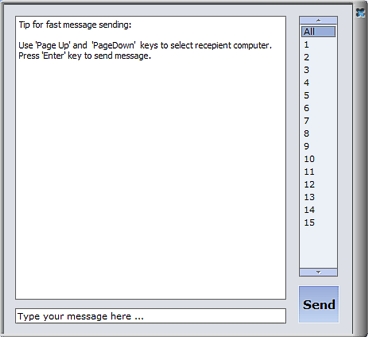
All customer messages are stored in
the message list. Read them by pressing message button. Sending message
to a specified user or all of them in the cafe is simple:
1. Type a message in the edit field
2. Choose a user you want to send message to
3. press Send button
Automatic reconnection can be used if
Client lose connection with Caffe Server. press this button and all
Clients will be reconnected to Server. This option is represented with
the 'Chain' button.
Statistics provide full billing and income control and show you when and which items were charged.
• 'Type' - Filter your statistic by type of item you charged
• 'Employee' - Filter your statistic by an employee
• 'Discount' - Show only discounted bills
• 'Payment' - Filter your statistic by type of payment (cash, check,credit or debit card)
• 'Computer' - See statistic for specified computer
• 'Export' - Export your report in *.csv, *.txt, *.html or *.pdf format
• 'Print' - Use it to print report
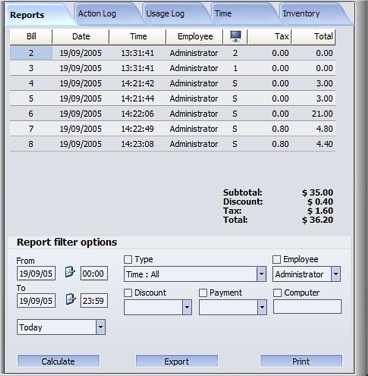
Tip:
Right click on the bill to 'Show Bill/Items' charged on one bill (every
bill consists of one or more items which can be checked this way),
'Print selected bill' or 'Delete bill'
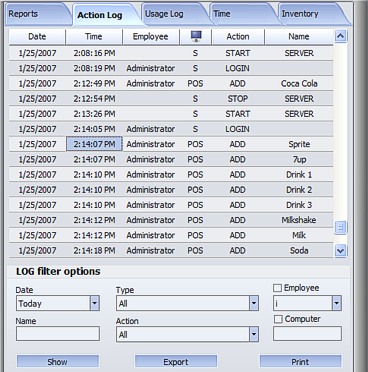
| Action and usage LOG database |
|
|
All actions of the employees are
logged and this can be used for detail analysis. Every Start and Stop
of the session, employee login and Logoff, every sell is stored in
central database log file. Of course, there is filter engine for faster
search.
Internet Caffe Server has additional
protection for the uncharged bills. If your employee close Caffe Server
and don't stop all the clients, Server will enter 'STOP!' in
database for any of the shopped clients. Other protection methods are
enabled when customer reset the computer. In this case Server will
enter time and cost of the session in database, and the bill will be
marked with 'RESET!'.
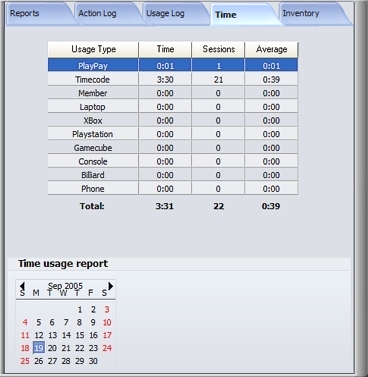
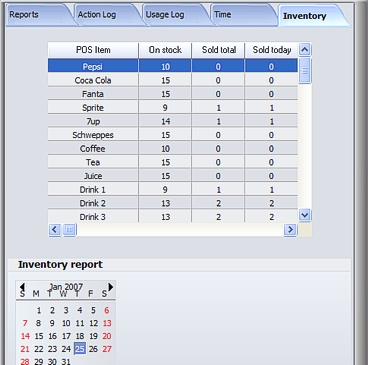
| Time usage and inventory report |
|
|
With this option you can see time
usage report for specified day and inventory statistic for each item
from point of sale (count on stock, sold total and sold today).
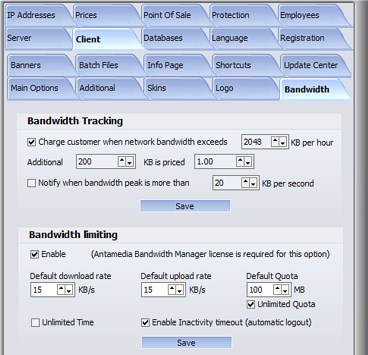
| Bandwidth (network traffic) tracking |
|
|
Thisoption can be used to
track, limit or additionally charge for extra bandwidth which a
customer makes. Since lots of cybercafes pay bills per GB of
transferred data, you will be able to have usage control.
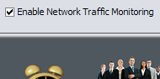
On the main Server panel, 'Enable Network traffic Monitoring'.
In this moment clients transfer tracking will be tracked. Additional
options can be specified in Server - Setup - Options - Bandwidth.
|
|
You can activate additional
charging when network bandwidth exceeds the specified number of
kilobytes per hour. Charge will be done in increments of additional
kilobytes.
Option 'Notify when bandwidth peak is more than...' will inform you when high network usage occur. Amount should be specified in KB per second.
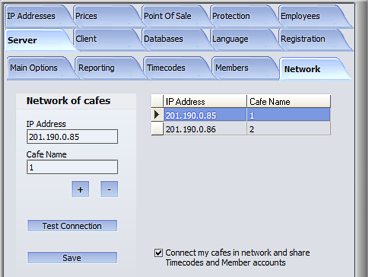
Network option is used to connect
cafes and share Timecode and Member accounts. To login with Timecode or
Member account generated in different cafe, type timecode or member
username followed by @cafename. For example, type test@1 as username (1
represents name of first cafe) and type password. We recommend keeping
cafe names short to make login easier.
Software will run on any pentium II processor-based
personal computer with 64 MB of RAM.
For better performance pentium III with 128 MB of RAM (and faster
computers) are recommended (depending on the number of client
computers).
Internet Caffe Software runs on Windows 95/98/ME/NT/2000/2003/XP/Vista
If you like to customize Caffe Server settings to your needs, please read Setup Manual
If you have any question which is not explained in Manual, feel free to contact us!
To download latest versions of our software please go to download section.
|